Import resources
Import files from a server with the Metadata Publishing Tool
Hint
There are several ways to overcome problems with the exchange of files between servers and your local or network drive. One way is to use an scp client, which is described on this page.
Another way is to use DropBox-like solutions. See for instance B2DROP and WebDAV.
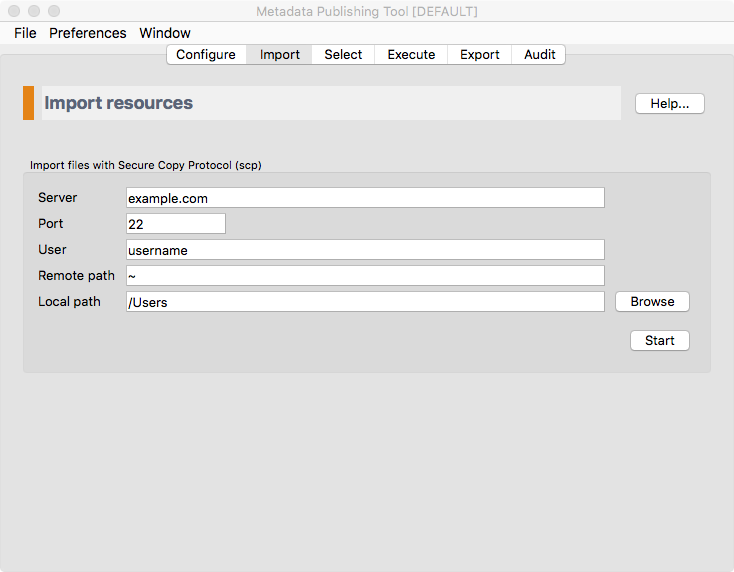
Screenshot of the import page
Important
The import functionality is only necessary if your files (EAD files in the case of EHRI) are on a server. If your files are on a local or networked drive you may skip this page of the wizard.
With the import page you can copy files from the remote server to a local or networked drive with the aid of the Secure Copy Protocol (scp).
Parameters on the import page are best set with the help of a technically skilled person. The variables on this page are part of the same named configuration as the one from the Configuration page and are saved automatically. Once parameters on this page are set, all you have to do each time you want to import your remote files to your local environment is press the Start button (and remember your password).
In the following paragraphs we’ll describe the import process in detail.
SCP parameters
Hint
Different scp parameters can be set on each configuration. They are saved automatically.
- Server
- The name or IP address of the server.
- Port
- The port on the remote server. Default scp port is 22.
- User
- The username on the remote server.
- Remote path
- The path to the directory on the remote host. All files and folders in the remote directory will be copied recursively to the Local path (see below).
- Local path
The path to the directory on the local or networked drive that you wish to copy to. All files and folders in the directory on the Remote path (see above) will be copied recursively to this directory. Directories on the local path that do not exist will be created.
The button Browse will open a file explorer that enables choosing the local directory.
Running an import
After pressing the Start button, the import execution window will open.
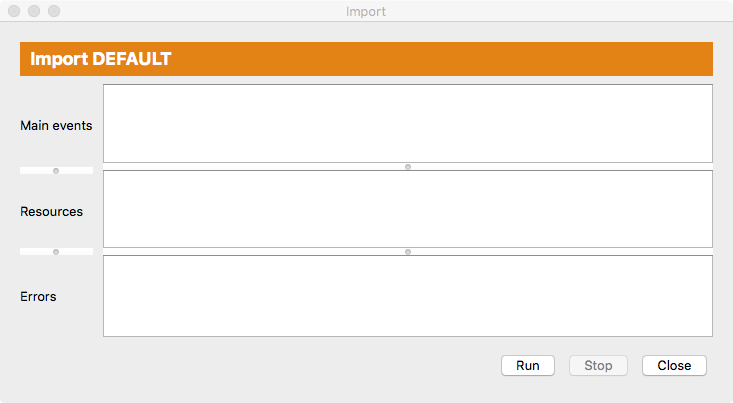
Screenshot of the import execution window
The import execution window has three areas for reporting events:
- Main events
- In this area main events of the import process will be reported.
- Resources
- In this area files that are imported are listed.
- Errors
- In this area errors that took place during the import process are reported.
All areas can be enlarged or made smaller by grabbing the horizontal handle bars. Of course, the import execution window itself can also be reshaped.
Press the Run button to start the import process. A dialog appears in which you have to type your password for the remote server.
Tip
While the import process is running you may at any time press the Stop button to interrupt the process.
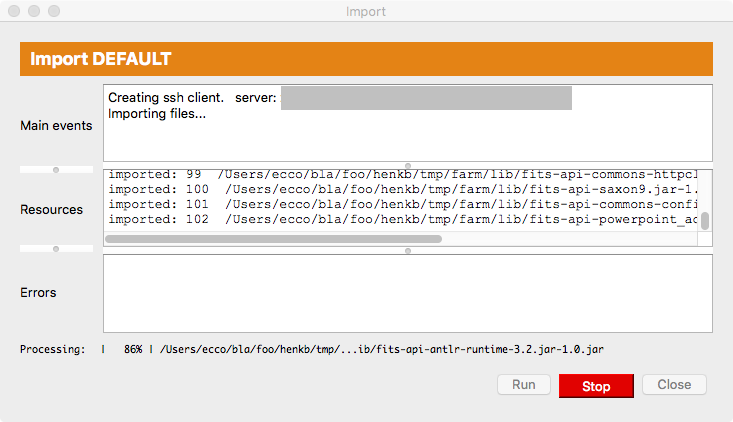
Screenshot of the import execution window while the import process is running
After the process has ended without errors the complete file and folder tree of the remote path is now on the local path.